Today’s weekend post focuses on fingering; a topic about which I often write for the reason that I feel it’s particularly important for students of all levels. This article is the first in a two-part series written for the September 2018 edition of Piano Professional, published by EPTA (European Piano Teachers Association), for whom I regularly write a technique feature.
Fruitful Fingering Part 1
Fingering comes in all different guises and there is certainly no ‘one-size-fits-all-approach’; much can depend on the size, shape and disposition of the hand. However, there are certain fundamentals which might be applied to most hands, and with that in mind, some of following suggested techniques will hopefully prove advantageous for all kinds of repertoire. This is the first of two articles examining various fingering strategies and ideas which may be useful for your students.
If you use Urtext editions, fingering will have generally been written in to the score by an editor or in some cases, the composer, but irrespective of who has added the fingering, it’s always possible to change it and replace with your own. As a teacher, I often spend a significant amount of time during lessons either adding or changing fingering, and sometimes fingering may have been drafted in to the score at the very start of the learning process only to be changed after a week or two, if a more suitable one miraculously comes to light.
A crucial factor, when educating our students about the benefits of idiomatic fingering, is the practice and absorption of scales, arpeggios and broken chords. Students and teachers frequently bemoan their existence in exams, but they do serve a myriad of purposes. I have written extensively about the importance of scales as technical exercises, but another, often overlooked, factor is that by assimilating all the scale and arpeggio technical work properly, students learn ideal fingerings for much passage work.
Baroque and Classical repertoire is routinely constructed from standard scale patterns, and therefore it’s both pragmatic and practical to base fingerings for such passages on those learnt from scales. The following is a good example; hailing from the first movement of Beethoven’s Sonata in C minor Op. 10 No. 1, the scale passage in the right hand can be clearly identified as that of E flat major (starting on the third of the scale), and if the same fingerings are employed as in the scale, the passage is that much easier to grasp:
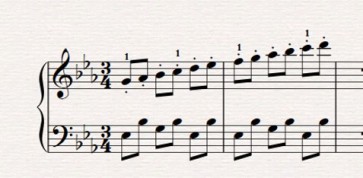 Contrary motion scales prove a useful tool for learning symmetrical playing. If the thumbs or same fingers (in either hand) can play together when moving in the opposite direction, coordination feels comfortable. This won’t always be possible, but when our students are starting to play scales, aim to begin with simpler objectives.
Symmetry is also at work when learning arpeggio patterns. Fingering must be well-defined in arpeggios; the left hand, particularly, relies on the careful use of the third or fourth finger:
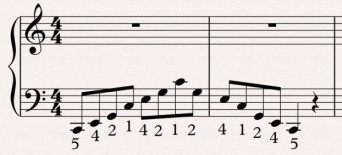 In this example, it might seem taxing to use the fourth finger on the E (the second note in the C major arpeggio), but using the third finger here, as suggested in some exam manuals, renders an awkward position for the hand. Eventually, the fourth becomes accustomed to the second note, and this helps with chordal playing too. However, when playing a major third at the start of an arpeggio, such as in D major, the third finger would be ideal:
 Encouraging students to learn these patterns accurately from the start is a good plan, as it becomes tricky to change them at a later date. The brain seems hard-wired to play the first fingering pattern it learns – changing always feels alien.
Aim to play in position as much as possible. This involves limiting turning the hand, or changing hand positions. Hand turns can lead to uneven playing, especially when a melodic line is involved. Bumpy or jerky playing can happen when there are too many thumbs on the scene. If students can be coaxed into using their fourth and fifth fingers as frequently as the inner part of their hand i.e. the thumb, second and third fingers, not only will the hand be more balanced whilst playing passage work, but it will also feel more natural, with considerably less movement. In order to do this, the outer fingers will require sufficient practice, so that they are able to cope with the demands of playing crisp passage work. With this in mind, it might be pertinent to use a few daily exercises, but only with the guidance of a teacher, as it’s easy to ‘lock-up’ or become tense without cultivating flexibility in the hand and wrist when working at developing finger strength.
Know your thumbs! Thumbs can be pivotal for secure playing; knowing where they occur in both hands, and where they don’t need to occur, will create confidence. Once students are aware of thumb placement, the other fingers tend to fall in to place. Although thumbs provide stability when playing, as they tend to ‘anchor’ passage work, the challenge is to listen optimally so they do not dominate; they must ideally be tonally equal to all the other fingers, therefore we must strive to find ways to camouflage thumb ‘accents’ which can happen due to thumb physiology.
When writing fingering in the score, it can be enough to pen where thumbs arise, as opposed to marking every finger, but I still tend to write in much more fingering than this for my students. If possible, try to ensure that hands work in tandem; occasionally what seems like the best fingering in the right hand might become unworkable when both hands play together.
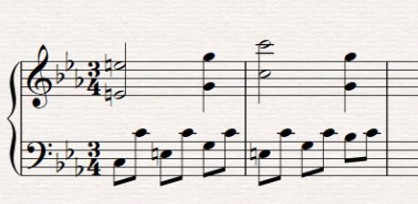
Repeated patterns or sequences can be an excellent way to absorb fingering quickly. Sequences of notes or note patterns may lend themselves to replica or repeated fingering i.e. the same patterns over and over again. Repetition is key here, and the ‘blocking-out’ technique can prove a suitable method of learning i.e. playing note patterns all together in one go, enabling pupils to find the notes and their corresponding fingerings at once. This can be seen in the following example, which shows two bars from the first movement of Beethoven’s Sonata in C minor Op. 10 No. 1. The first example illustrates how the Alberti Bass pattern in the left hand appears in the score, and the second, how it might be practised (keeping the same fingering throughout):
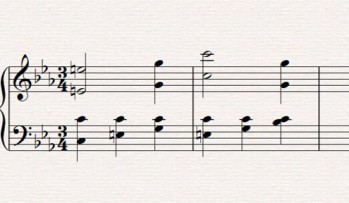 Further to the second example, for even swifter learning, the entire bar could be played as one or two chords (where possible).
Repeated notes are a different fingering issue altogether. There are often two schools of thought; some believe it’s better to change fingers on every note during a repeated note passage, whilst others find using the same finger achieves a more pleasing result. I encourage students to try both methods, and decide for themselves. Let’s examine the following passage, which is the opening of Turina’s Fiesta Op. 52 No. 7, right hand:
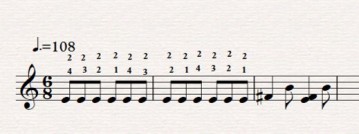 Both fingerings are acceptable. By using the same finger, or the top fingering in the example, you may find that students are able to create a smoother, more even repeated note passage. For clarity and control, advocate keeping the second finger close to the keys and employ a gentle finger tapping movement.
Finger substitution is a preferred method of playing legato. It’s too easy to rely on the sustaining pedal to ‘join’ note passages. If a pianist can continually substitute or change fingers on one and the same note, fluent, smooth playing should be the happy result. Finger substitution entails holding a key down with one finger whilst quickly swapping to another finger or thumb, ensuring the same note is held for the entire procedure. This technique enables pianists to form an unbroken musical line whilst playing other note figurations or patterns underneath (or above).
Finger sliding utilizes the same finger to literally ‘slide’ from note to note. I call this the ‘illusion of legato’ and it may also be a useful technique for larger intervals too; notes don’t actually need to be next to each other to benefit from the sliding approach.
Sliding requires a very smooth manoeuvre, where the second note of any ‘slide’ must not only match the sound to that of the dying first note, but should also aim to avoid gaps in the sound between notes. Astute listening is paramount. Students might like to work at the following exercise. After practising this exercise using the thumb, play it with the second finger, and then third finger:
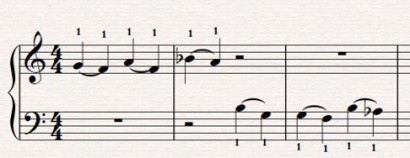 Fingering is of utmost importance when learning to play smoothly, evenly and proficiently. It’s for this reason that we must offer our students a thorough grounding, so that they are eventually able to annotate scores for themselves.
Click on the link below to read the original article:
My Publications:
For much more information about how to practice piano repertoire, take a look at my two-book piano course, Play it again: PIANO (Schott). Covering a huge array of styles and genres, 49 progressive pieces from approximately Grade 1 – 8 level are featured, with at least two pages of practice tips for every piece. A convenient and beneficial course for students of any age, with or without a teacher, and it can also be used alongside piano examination syllabuses too.
You can find out more about my other piano publications and compositions here.
from Melanie Spanswick https://melaniespanswick.com/2018/09/30/fingering-part-1/
No comments:
Post a Comment